If you own a 2001-2005 PT Cruiser you might find this FAQ helpful if one or more of your electric window switch illumination bulbs is burnt out. This assembly sells for over $100 aftermarket and the design was not really intended to be serviced. It was designed to be replaced as a unit.
However, I took one apart to see what was inside and determine if I would be able to repair mine. As it turns out, it can be repaired though, finding a good used one, or one that has at least one working bulb in it might be a good option if you are skilled at electronic soldering, have good vision and some good quality electronic soldering tools and a steady hand. You can use parts from several assemblies to make one good working one if you can't find a good used one with all the bulbs still working.
The local pull-a-part gets $8.95 for a multi-window switch assembly.
STEP 1
You begin by removing the switch from your dash. That is a pretty easy process, you just pull it forward at the top and then the bottom and it pops right out of the dash pod. Release the wiring connector lock by pushing the red lock tab to the side, then press on the black tab under the red lock to slide the connector off.
STEP 2
The 2nd step is to the remove the back cover of the switch assembly. It is held in place by for small ramp locks, use a small flat head screw driver or similar tool to lift on each lock and pull the cover away from the assembly. Don't pry the locks p too far or they will break.
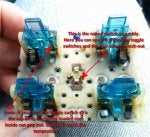
Once you have the back off, you will see the two plane electronic PCB board inside. It looks like this.
![Image]()
Step 3
Use the small screwdriver to lift each corner gently till you hear a slight pop sound. That 'pop' is the sound of the button cap releasing from the toggle switch post. Once all four caps have released, you can slide the PCB out of it's housing...slowly. The rear window lockout switch has a small spring loaded post that you need to watch for as well as a small piece of contactor. You can see this in this picture.
![Image]()
It is the button caps that snap/lock over the top of the toggle switches that actually hold the PCB in the case. Removing the PCB from the case can break the locks on the button cap, so its a good idea to start this process with a used unit that you have already taken apart for spare caps (and bulbs) if needed.
This is what the assembly wold look like w/o the button caps.
![Image]()
This shows a broken lock on a button cap
![Image]()
Each of the blue toggle switches is actually a spring loaded rocker switch, it has two small springs, and two small plastic rods on the bottom edge. They will/can fly out if you test the switch w/o the cap on it. You can move the toggle if you like just notice that it has a leg on one side and no leg on the other and dont move it too far, else the rod and spring will be released.
![Image]()
Step 4
There are three micro bulbs, 1 for the rear window lockout illumination, and 2 for the front window switches. There is no illumination for the rear window switches. The bulbs are the same, but the rear window lockout switch uses a different base than the other two. The micro bulb for the lockout can pretty easily be serviced w/o separating the two PCBs. The front window switch illumination bulbs will require you to separate the two PCB boards and then reassemble.
![Image]()
In the picture below, you can more clearly see how the window switch illumination bulbs are mounted to the PCB. They are quite small and will require some precise de-soldering/soldering.
![Image]()
However, I took one apart to see what was inside and determine if I would be able to repair mine. As it turns out, it can be repaired though, finding a good used one, or one that has at least one working bulb in it might be a good option if you are skilled at electronic soldering, have good vision and some good quality electronic soldering tools and a steady hand. You can use parts from several assemblies to make one good working one if you can't find a good used one with all the bulbs still working.
The local pull-a-part gets $8.95 for a multi-window switch assembly.
STEP 1
You begin by removing the switch from your dash. That is a pretty easy process, you just pull it forward at the top and then the bottom and it pops right out of the dash pod. Release the wiring connector lock by pushing the red lock tab to the side, then press on the black tab under the red lock to slide the connector off.
STEP 2
The 2nd step is to the remove the back cover of the switch assembly. It is held in place by for small ramp locks, use a small flat head screw driver or similar tool to lift on each lock and pull the cover away from the assembly. Don't pry the locks p too far or they will break.
Once you have the back off, you will see the two plane electronic PCB board inside. It looks like this.
Step 3
Use the small screwdriver to lift each corner gently till you hear a slight pop sound. That 'pop' is the sound of the button cap releasing from the toggle switch post. Once all four caps have released, you can slide the PCB out of it's housing...slowly. The rear window lockout switch has a small spring loaded post that you need to watch for as well as a small piece of contactor. You can see this in this picture.
It is the button caps that snap/lock over the top of the toggle switches that actually hold the PCB in the case. Removing the PCB from the case can break the locks on the button cap, so its a good idea to start this process with a used unit that you have already taken apart for spare caps (and bulbs) if needed.
This is what the assembly wold look like w/o the button caps.
This shows a broken lock on a button cap
Each of the blue toggle switches is actually a spring loaded rocker switch, it has two small springs, and two small plastic rods on the bottom edge. They will/can fly out if you test the switch w/o the cap on it. You can move the toggle if you like just notice that it has a leg on one side and no leg on the other and dont move it too far, else the rod and spring will be released.
Step 4
There are three micro bulbs, 1 for the rear window lockout illumination, and 2 for the front window switches. There is no illumination for the rear window switches. The bulbs are the same, but the rear window lockout switch uses a different base than the other two. The micro bulb for the lockout can pretty easily be serviced w/o separating the two PCBs. The front window switch illumination bulbs will require you to separate the two PCB boards and then reassemble.
In the picture below, you can more clearly see how the window switch illumination bulbs are mounted to the PCB. They are quite small and will require some precise de-soldering/soldering.